Cute Heart Accents | Valentine’s Day Hairstyles
Today we will be showing you how to create Heart Accents, fitting right into our Valentine’s Day Hairstyle theme we’ve…
Cute Heart Accents | Valentine’s Day Hairstyles
Today we will be showing you how to create Heart Accents, fitting right into our Valentine’s Day Hairstyle theme we’ve…
The Viking Braid Ponytail | Hairstyles for Sports
When we started playing around with this hairstyle, it totally seemed like something a viking princess would’ve worn, hence the name…
How to Create a Messy Split Fishtail
I’ve been receiving requests on FB, Twitter, email, etc, for today’s hairstyle from viewers everywhere. It’s likely been our most…
Katniss’ Mockingjay Braid | Hunger Games Hairstyles
Many of you know that were are HUGE fans of The Hunger Games books and movie franchise! We’ve been friends…
Bailey’s Dorothy Braids | Halloween Hairstyles
Ever since Brooklyn and I were little girls, we were fascinated with Dorothy from The Wizard of Oz, starring Judy…
Boho Lace Tieback | Bohemian Chic Hairstyles
This week’s hairstyle uses a similar technique as our Lace Braided Heart, only our purpose here is to highlight the…
Double Dutchback | Heidi Klum Hairstyles
My dad is so cute! He’s so proud of our family, our fans, and what this hair thing has accomplished!…
Diagonal French Loop Braid | Cute Braid Hairstyles
Today’s hairstyle is inspired by the combination of the Diagonal Bow Braid and the Zipper Braid. Brooklyn volunteered to be…
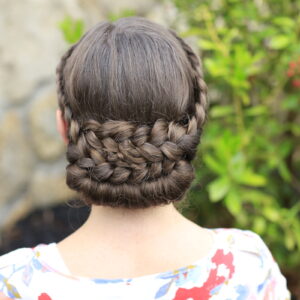
How to create a Lace-Rolled Updo
Time for another beautiful updo hairstyle! It is Summer, and it is hot, and we are always looking for ways…
Waterfall Twist Rope Braid | Summer Hairstyles
Summer is here! My girls and I are always looking for hairstyles that take the hair out of our faces…
How to Create a 4-Strand Waterfall Braid
Yes, we are taking a trip back in time to add a feature to a hairstyle that we made near…
The Alternative Braid | With Abby from TwistMePretty
Many of you know that I started as a hairblogger before becoming a YouTuber. As such, I am very familiar…