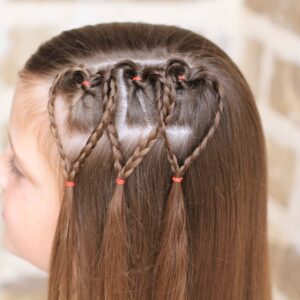
Triple Braided Hearts | Valentine’s Day Hairstyles
For those of you who are super fans, you will know that we started this hairblog to document our girls’…
Triple Braided Hearts | Valentine’s Day Hairstyles
For those of you who are super fans, you will know that we started this hairblog to document our girls’…
How to Create a Love Bun | Valentine’s Day Hairstyles
Valentine’s Day is right around the corner, and as is customary, every year we try to add one more cute…
Waterfall Twists into Mermaid Braid | Cute Hairstyles
Feel free to follow CGH on Instagram to see behind-the-scenes photos of our hairstyles and family! Many fans have emailed…
Twist-Braided Heart | Valentine’s Day Hairstyles
I love Valentine’s heart hairstyles! Of all the holidays, Valentine’s Day is my favorite theme for styling hair… there is…
Hair Bun with Micro-Braid Accents | Updo Hairstyles
As the second video of my collaboration with EveliniCutza on YouTube, we wanted to share with you the style we…
How to Create a DIY Dutch Waterfall Braid | Cute Braided Hairstyles
Last week I showed you how to create a Dutch Waterfall Braid on my daughter… Because it is a tricky…
Dutch Flower Braid | Updo Hairstyles
It was so funny that just a little over a week ago we started receiving lots of Facebook photo posts…
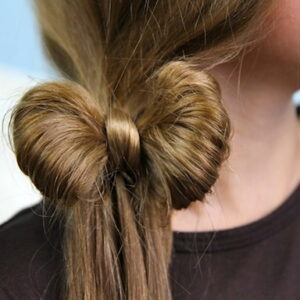
The Ponytail Bow | Cute Hairstyles
Yes, I have been on a bit of a “bow” kick lately with our braids and hairstyles, but that is…
7 Easy Valentine’s Day Hairstyles
With tomorrow being Valentine’s Day, don’t forget to send your daughter off to school with a super cute heart hairstyle!…
Lace Braid Heart | Valentine’s Day Hairstyles
One of my favorite hairstyles for Valentine’s Day has to be the Lace-Braid Heart… I’ve had this requested via emails…
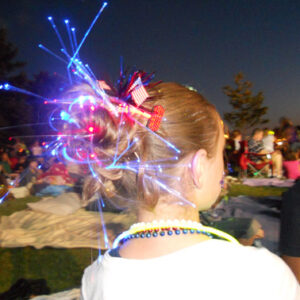
Messy Glow Bun | 4th of July Hairstyles
We decided to get really creative with this 4th of July hairstyle! This can be done for any national celebration…
Ribboned Bobby Pins | Tips and Tricks
This video tutorial shows a very simple way to spice up an updo hairstyle, for any holiday occasion. This one…