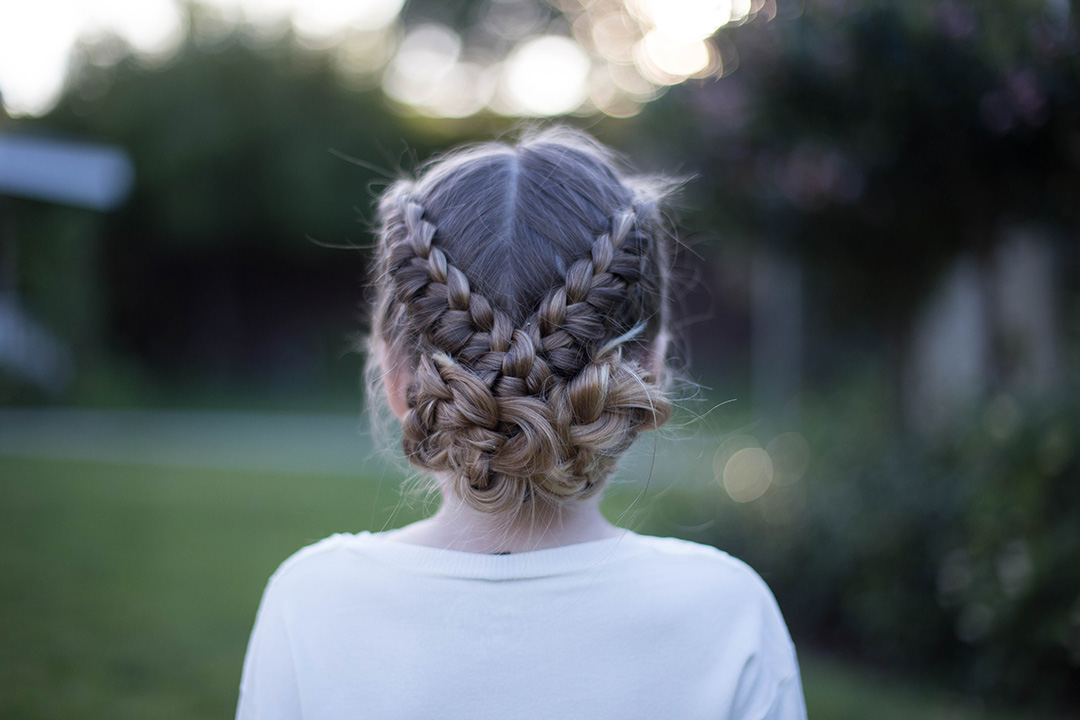
I love a good combo hairstyle! You can use different braids and combine them to create a totally new look! The Flip Over Braid uses braid, flips and twists. (Sounds like a gymnastic routine!) This hairstyle is perfect to add to your list of athletic or sporty hairstyles. To see your own photo recreations of this style featured in our app, feel free to tag your photos on IG with: #CGHFlipOverBraid
Items Needed: Brush, rat-tail comb, spray bottle, hair elastics, hairspray, bobby pins{if desired}.
Time Requirement: 5-10 minutes
Skill Level: medium
Step-By-Step Instructions:
- Start by parting the hair down the middle. Secure one side with an elastic to keep out of the way temporarily.
- Pick up a small triangle section in the front of the side you are starting on.
- Begin a dutch braid. This means you are crossing an outside strand under the middle strand. Then cross the opposite outside strand under the middle strand. Now continue to alternate crossing outside strands under the middle strand only now you will add new hair to the outside strand before you cross.
- Once you have braided about 4 stitches you will change it up a bit. With the bottom outside strand only, take half and flip it up over the top of the head. Pick up your new piece and add it to the remaining half of that bottom strand and cross under the middle strand.
- Remember you are only sectioning off pieces on the bottom outside strand as you braid. Continue this braid all the way down the hair.
- Once you run out of new hair to add, do a regular three strand braid a few stitches and secure with an elastic.
- Repeat steps 2-6 on the opposite side of the head.
- Take your two braids and combine them at the nape of the neck. Secure with an elastic. Now release your two temporary elastics that were holding your two braids separate.
- Go back to the front of one side and pick up the first three strands you left out of your braids.
- Cross the first strand (closest to the front) under the middle strand. Cross the third strand under the middle strand.
- Now cross the first strand (closest to the front) under the middle strand. Then add a new strand to the third strand and cross under the middle. Continue to braid only adding new pieces to the top side of the braid.
- When you run out of new hair to add into your braid, do a few stitches of a regular three strand braid and secure with a temporary small elastic.
- Repeat steps 9-12 on the opposite side of the head.
- Pick up one braid and flip it up and over itself. Secure with a couple of bobby pins.
- Repeat on the other side.
- You should now have an X with two braids and a ponytail in the center.
- Flip the ponytail up. Bring the two braids under the ponytail and join them together. Secure them with a small elastic.
- At this point, you could leave the bottom as a ponytail. Or….I picked up the top section and did a three strand braid all the way down. Secure with a small elastic.
- Go back and pancake your braid.
- Start rolling from the bottom going up. Roll braid into a flower and secure with bobby pins
- Repeat18-20 on the other side.
This week on Brooklyn & Bailey… “Get Ready With Me” Beauty & The Beast Edition!
This week on Kamri Noel… “Oddly Satisfying Things”

