Hello again everyone! Jenny from The Dot Couture and today I have some nail art for something I just KNOW everyone is thrilled about! BACK TO SCHOOL! *cricket cricket* No? Not so much huh? Well that’s ok. Since the first day of school is inevitable, why not have the cutest nails on campus? I have 4 cute back to school nail ideas that are sure to impress!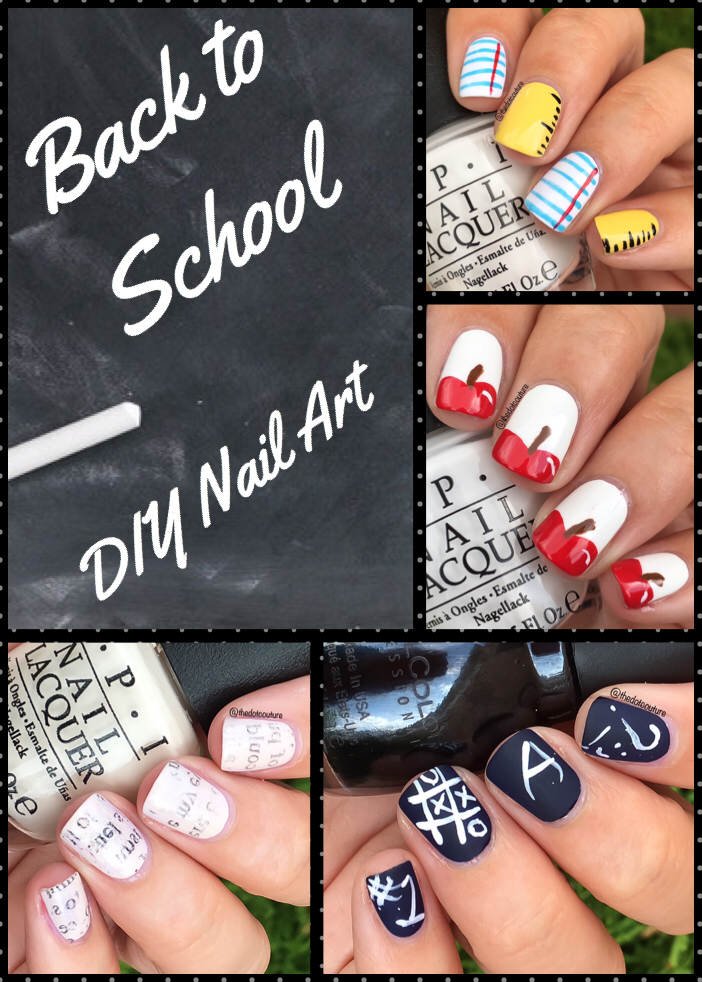 Chalkboard Nail Art
Chalkboard nails are a surprisingly easy DIY when it comes to nail art! All you have to do is paint your nails a black base (this is Sinful Colors Black on Black, $1.99 at most retailers). Then you take a small paint brush and some white acrylic paint and start painting on your nails. Pretty much anything goes here. Let that dry and then top coat with a quick-dry top coat. After about 15 minutes, you can use a matte top coat on top to get that chalkboard look!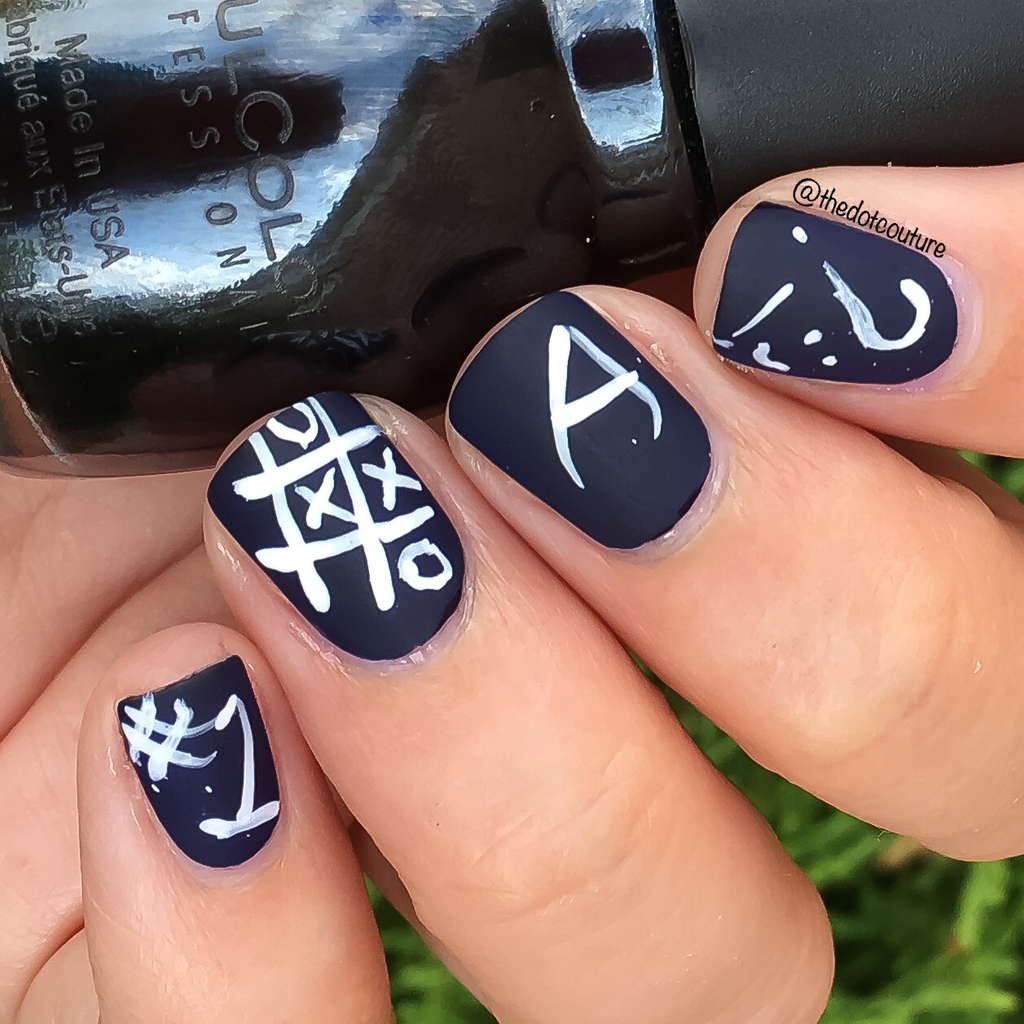 If you use pastel-coloured acrylic paints it will look like coloured chalk!! You can do this with white and/or pastel nail polish however working with acrylic paints is so much easier (less runny, more opaque, doesn’t dry as fast or get gloopy). Best of all is you can get them at the dollar store for cheap!
Paper And Ruler Nail Art
This is a cute look for back to school! And it’s really all small lines. I painted my pointer and ring fingernails with OPI Alpine Snow and my middle and pinky fingernails with Sally Hansen XtremeWear Mellow Yellow. Let that dry and then break out your acrylic paints and paint brush!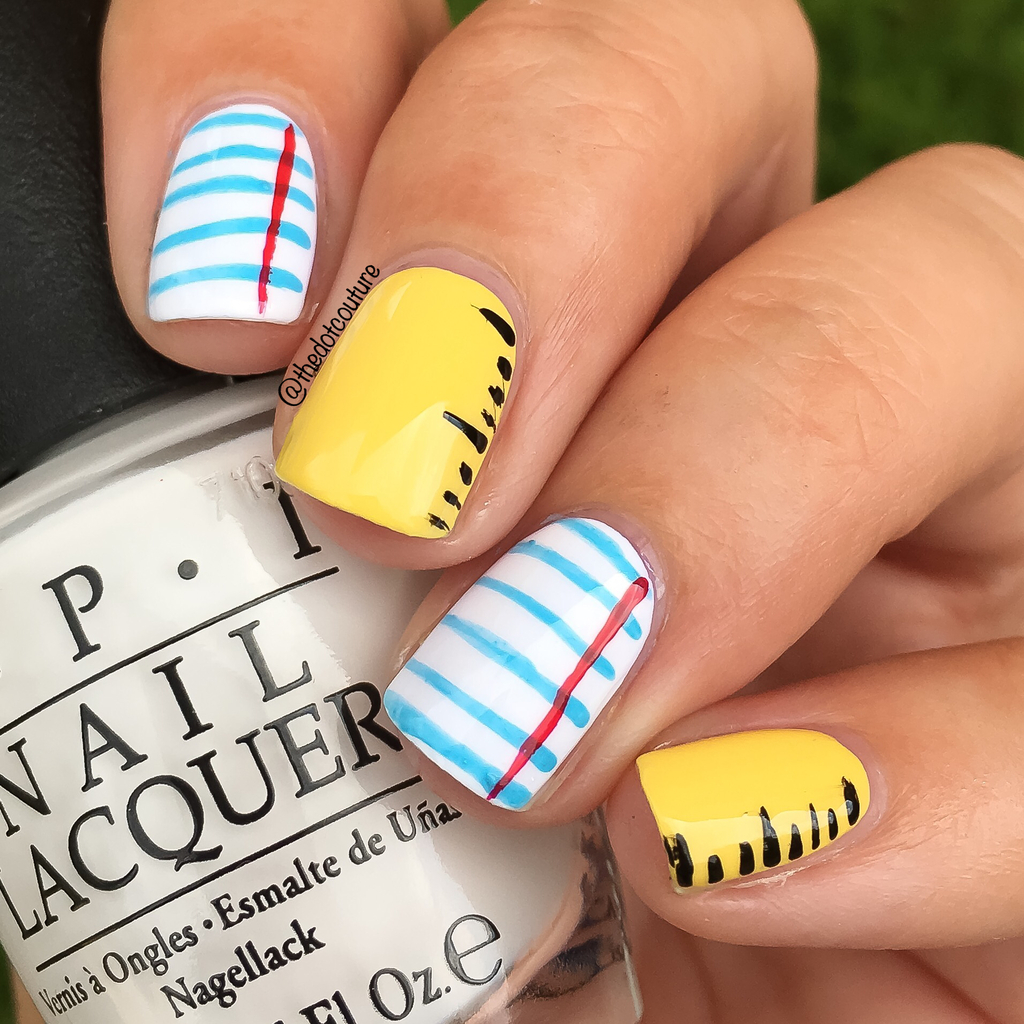 To make it look like loose-leaf paper, I drew blue horizontal lines across the white nails, and let dry. Finish with one vertical red line off to one side of the nail.
To create the ruler, I just made small lines along one side of my nail. Really easy!
Tip: it’s difficult to create straight freehand lines however I do think the fact that they aren’t perfect adds to their charm. To help yourself with lines, make sure both arms are well-supported on a flat surface like a table. Instead of moving the paint brush across the nail, hold the paintbrush steady and gently rotate your finger in whichever direction you are drawing the line. I find this helps to make a less-shaky line!
Apples For Your Teachers Nail Art
So what teacher doesn’t love apples! Everyone shows up to the first day of school with apples for their teacher right? Not really but I’m sure your teacher will appreciate how cute your nails look with these apples on them! This technique is easy! Paint your nails a white base (I used OPI Alpine Snow). Let dry. Pick a red polish and using a sweeping motion go from the outer edge of your nail dipping down towards the middle centre. Repeat on the other side so it makes a shape that resembles the top of a heart (you can use the technique describe above where you rotate your finger to help!) Let it dry. Once dry, use some brown acrylic paint (or polish) and a small paint brush to create the stem, and then use white acrylic paint to create a highlight on one top side of each apple. Let dry and top coat!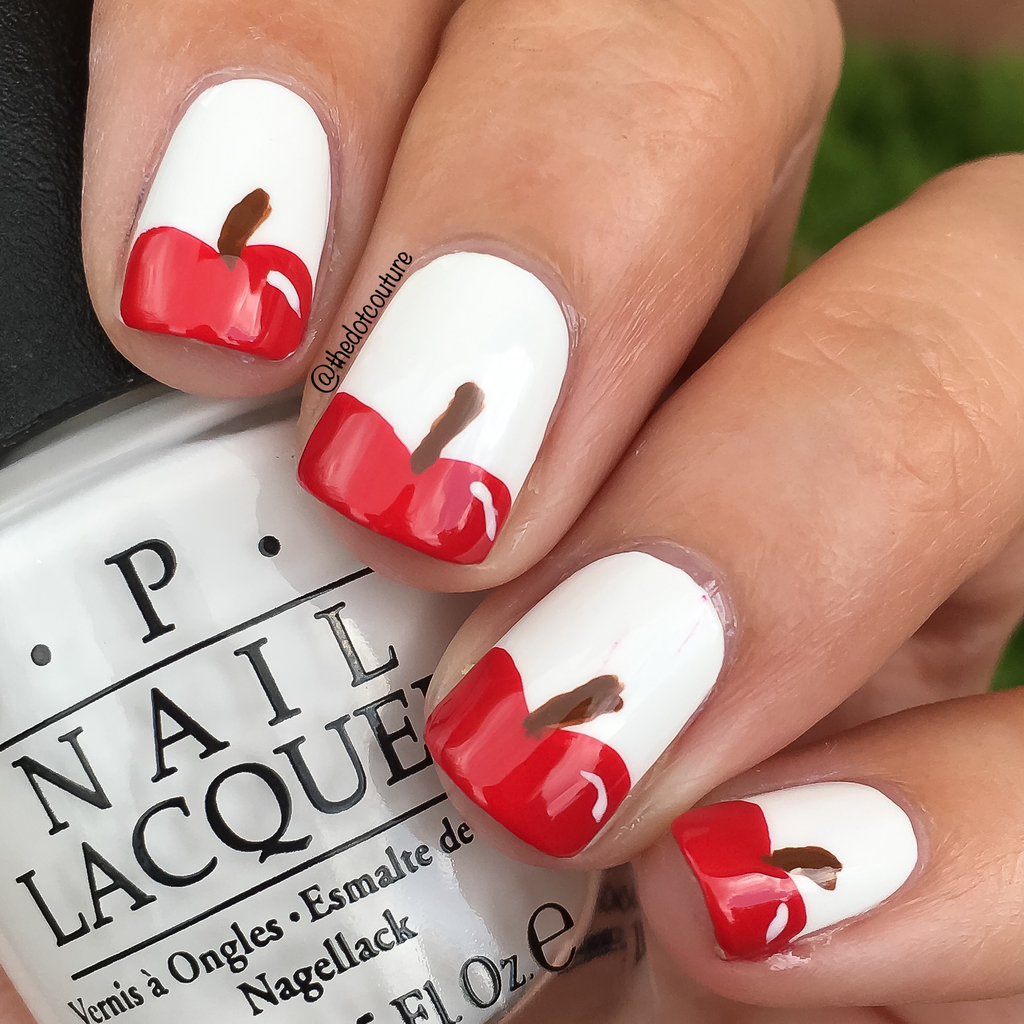 Newspaper / Book Nail Art
I’m really excited about these nails. I’ve heard about this technique for a long time but this was my first attempt and I love how it turned out! These are the perfect nails to impress your English teacher or if you are an aspiring writer. They are created using a page from a newspaper or a book. I lucked out and found an excerpt from a novel in the paper and used that. I even created a pictorial for you: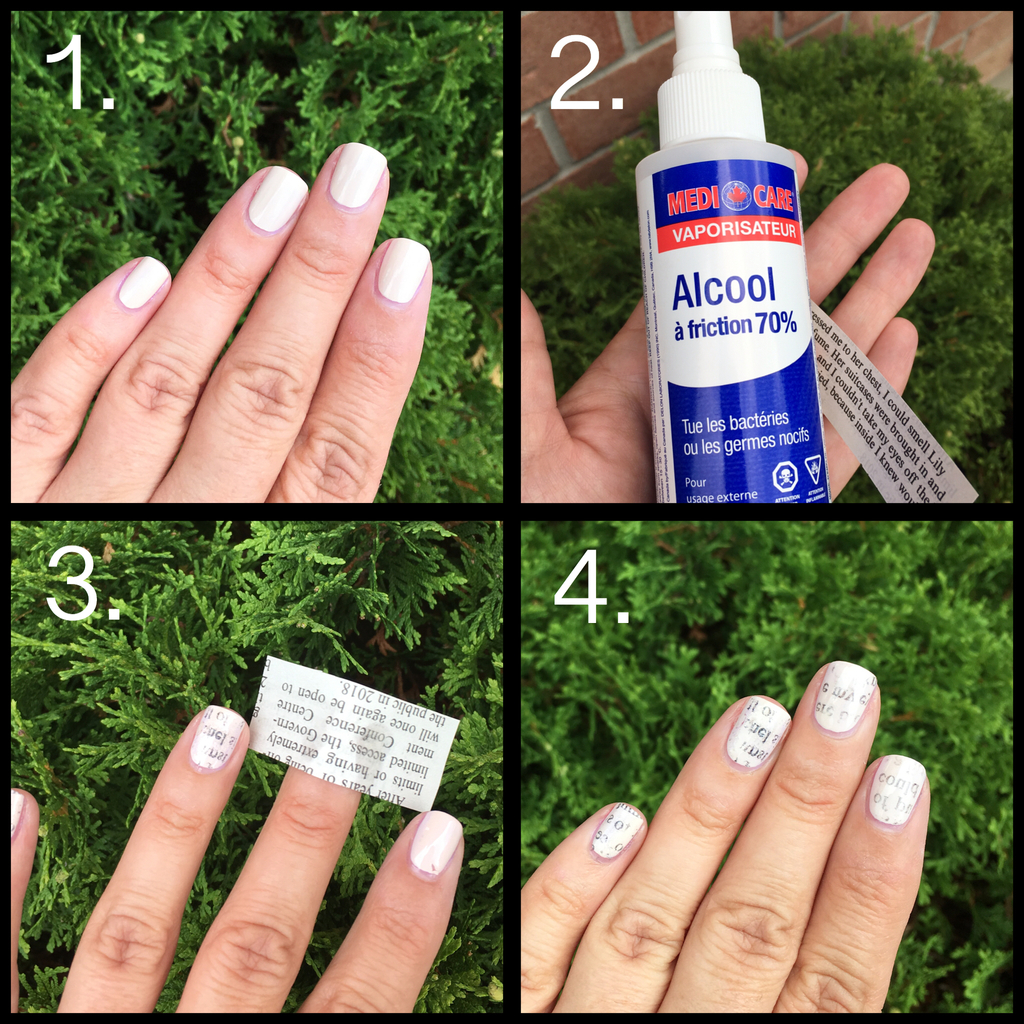 Step 1. Paint nails a base colour (a lighter colour works better – I did an off-white here).
Step 2. Cut out the piece of text you want to appear on your nails (it will be inverted when it’s transferred so don’t worry too much about what you use). Get ready with some Isopropyl Alcohol that is 70% or higher (I got mine at the local dollar store, it even has a spray on top!)
Step 3. Spray (or dip) your nail with the Isopropyl Alcohol and press the newspaper clipping down onto the nail. Rub around for a couple of seconds to transfer the text onto the nail.
Step 4. Peel off the newspaper very gently, and the alcohol should have caused the text to transfer just the inked words onto your nail! Top coat to make the look last.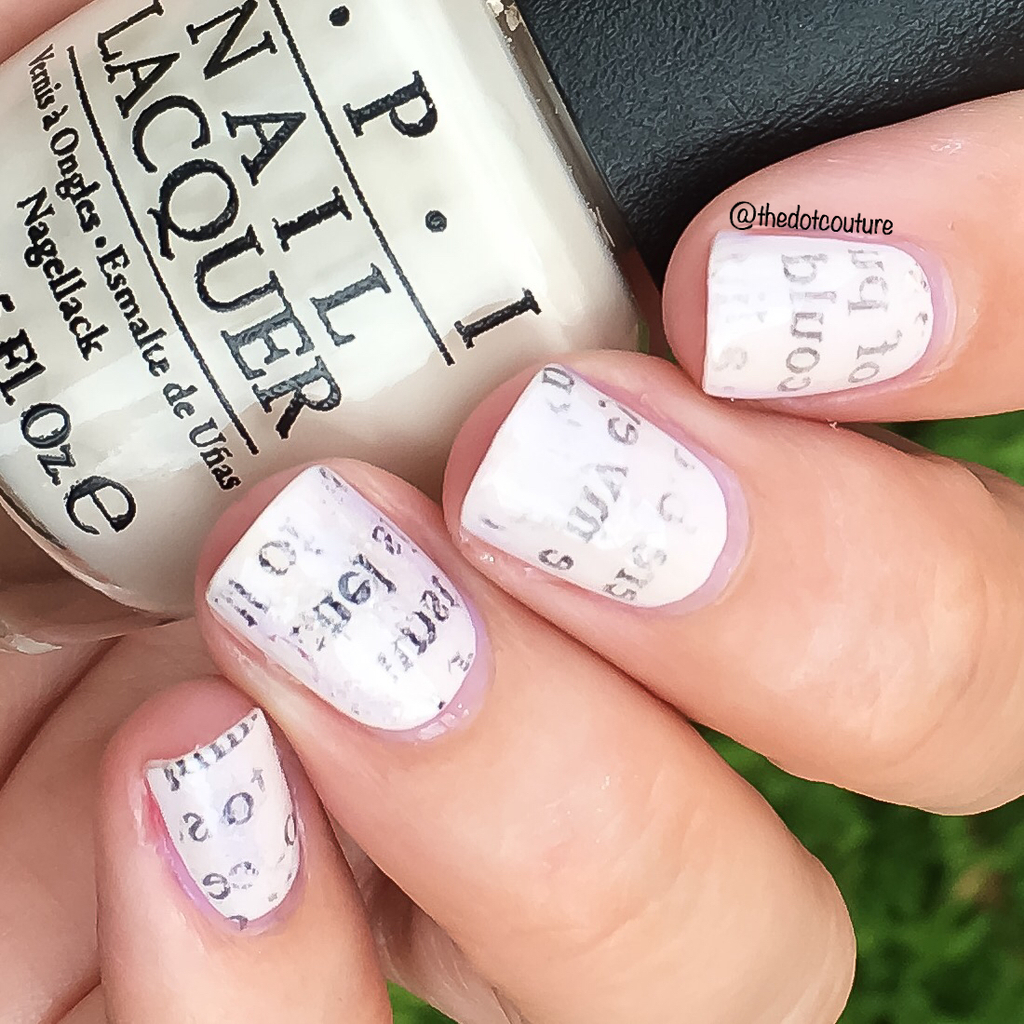 I love how this turned out and will definitely be doing these again!
I hope you enjoyed my back to school nail art ideas, which one do you like best?
If you like pretty nail art then come check me out on Instagram at @thedotcouture – I’d love to see you over there!
Until next time, happy painting!