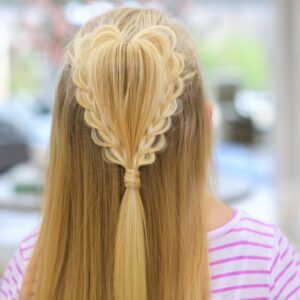
Fluffy Heart Braid | Valentine’s Day Hairstyle
January is flying by, and Valentine’s Day will be here before we know it! Every year I love thinking up…
Fluffy Heart Braid | Valentine’s Day Hairstyle
January is flying by, and Valentine’s Day will be here before we know it! Every year I love thinking up…
The Best Dutch Braid Hairstyles for any Occasion
I LOVE dutch braids! They’re super cute and fit great with any occasion! Check out 3 of my favorite dutch…
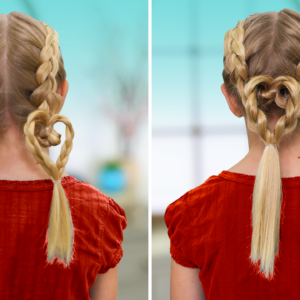
Valentine’s Day Hairstyles | Dutch Heart 2-in-1 Braid
Valentines’s Day is right around the corner! My niece Kilee came to visit, and she let me borrow her golden…
The No-Braid Braid | Easy and Cute Pull-Thru Hairstyles
New to braiding or just looking for a hairstyle that’s relatively easy? No problem! Pull-thru braids are a fun and…
My Favorite French Braid Hairstyles
Ever have those days when you want your hair to look elegant but don’t want to spend all day doing…
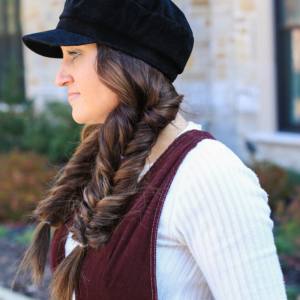
Who said that hat hair days had to be bad hair days?! In the wintertime, I’m all about hats! I…
Easy Hairstyles Ideas for Outdoor Activities
I’ve been super excited to have Paisley in gymnastics and cheer. The performances are so much fun! A lot of y’all have…
Halloween is almost here! I’ve been enjoying this fall weather and of course, picking out our family’s costumes! If you…
Having 2 girls with short hair, y’all have been asking what are some cute and easy hairstyles for shorter hair.…
My Favorite School Spirit Hairstyles
Fall in the (h)air! Time to bring on the football games and school spirit days! Check out 3 of my…
Homecoming season is here! This year things are a little bit different because we only have 1 of the kids…
My family is definitely ready for fall. Bring on the football games, the fair, and everything pumpkin spice. With Halloween…