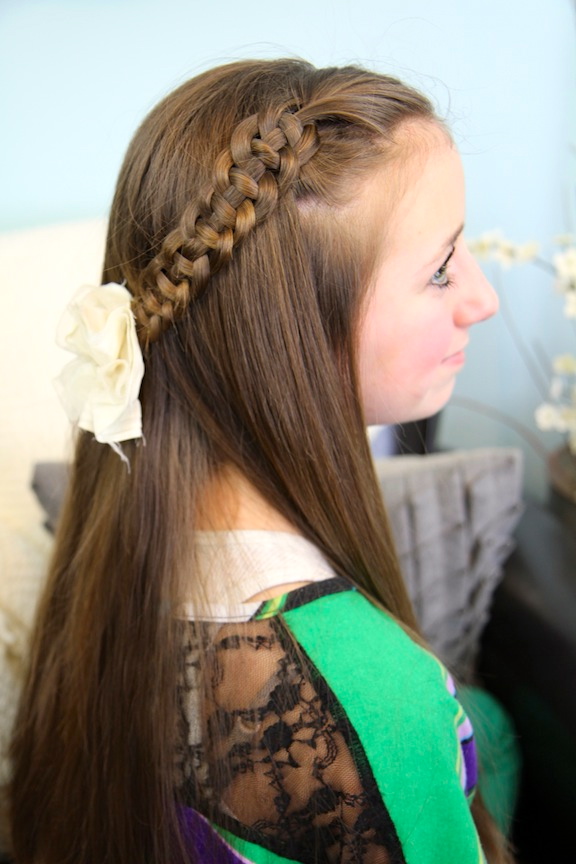
Lately my girls and I have fallen in love with pullbacks, specifically anything that easily pulls hair to the side, or from both sides. We think these looks are so subtle and effortless, yet still put forth a polished and super-cute look!
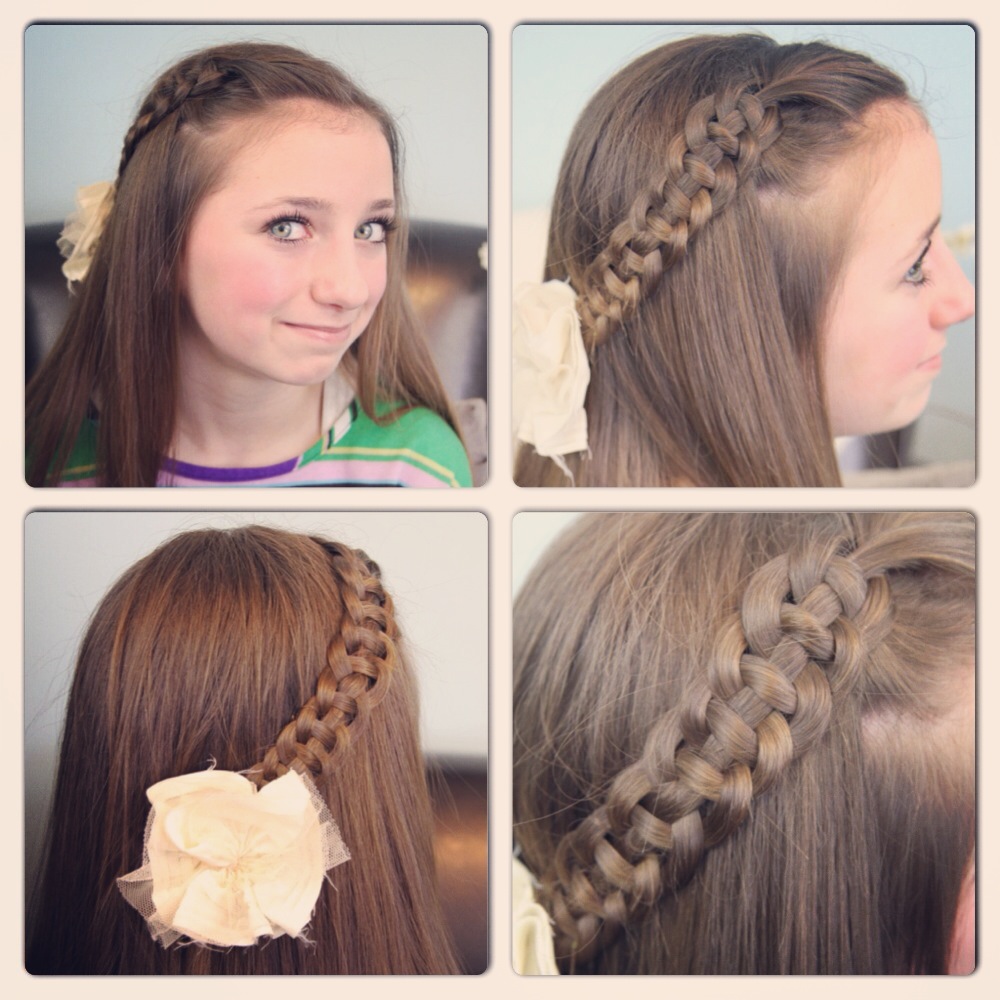
One of my newest favorites is this 4-Strand Slide-Up Braid! Although it may seem tricky at first, once you get the hang of it… you will find this braid to be a quick style that garners a lot of attention!
 We first posted the 3-Strand Slide-Up Braid on YouTube in December 2009 and it has nearly 6,000,000 views today! If you can do a three-strand braid that easily, you must be able to do a five-strand braid!
In this four-strand version, we show you two methods to create the braid… both ending with the exact same look! Simply find which one makes the most sense to you, and then go with it! {We are all about making things easier for you!}


Items Needed: Brush, rat-tail comb, spray bottle, 6 small hair elastics, hairspray, accessory {if desired}
Time Requirement: 5-10 minutes
Skill Level: Medium
Step-by-Step Instructions:
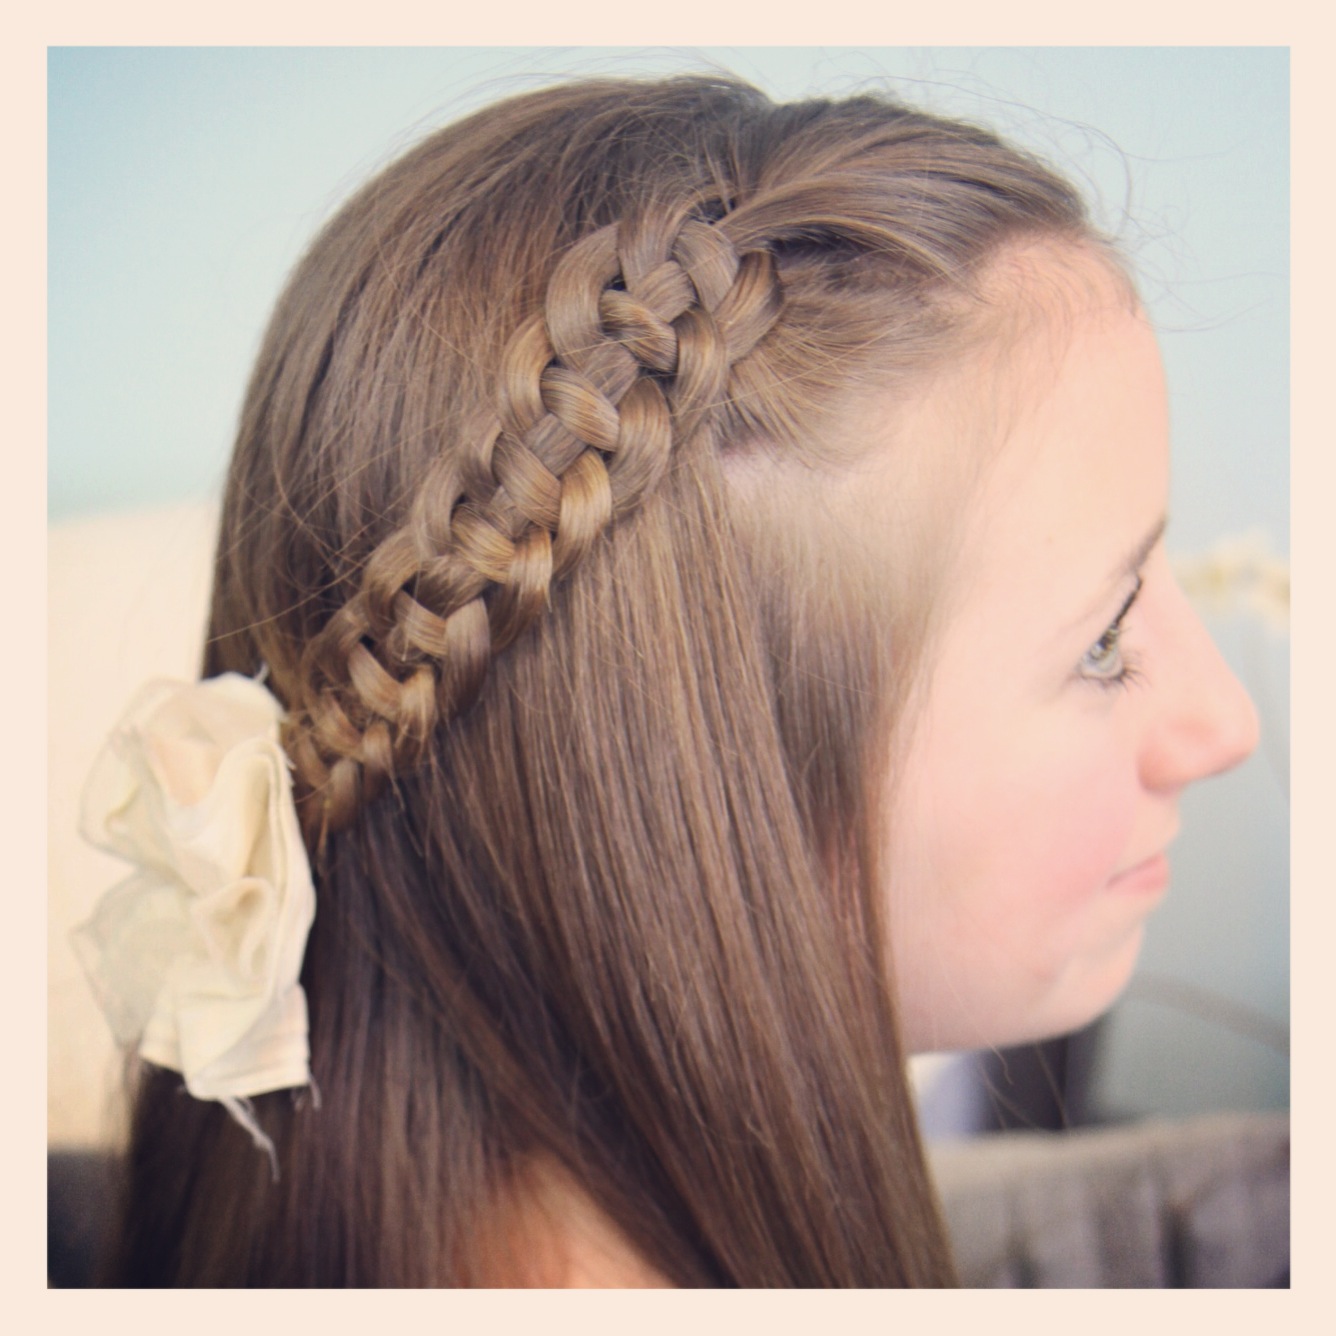
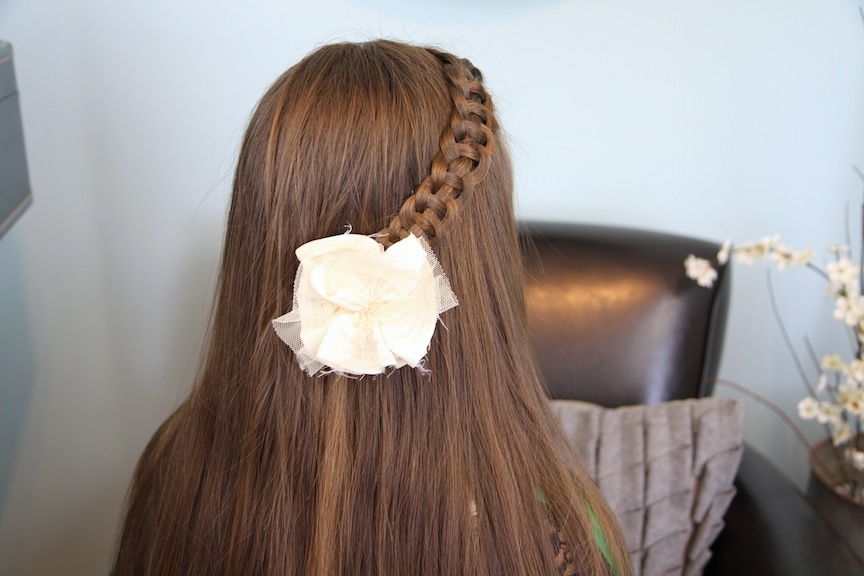
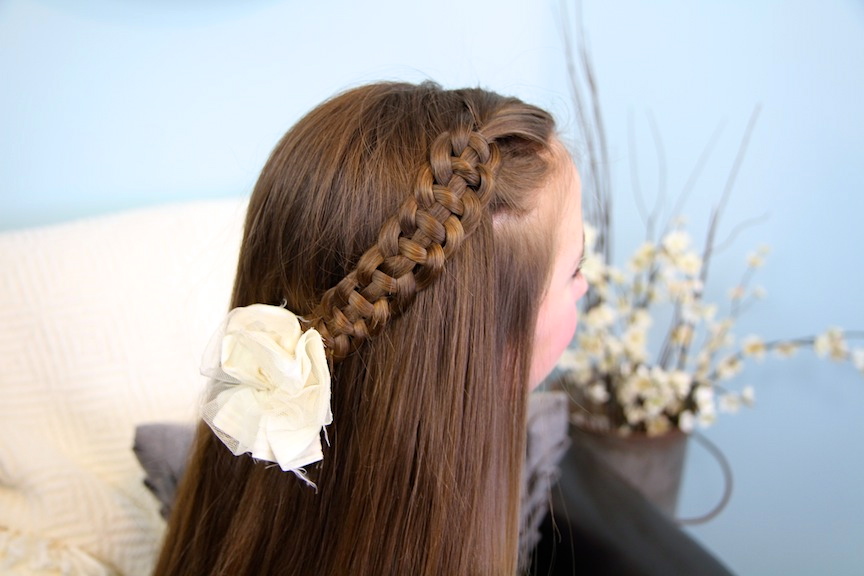
- Part the hair and figure out where you want the braid to lay {I did a side pullback, however you can also do this braid over the shoulder with all your hair, as an accent braid going straight down, as a braided headband, or even from both sides tied together in the back}…
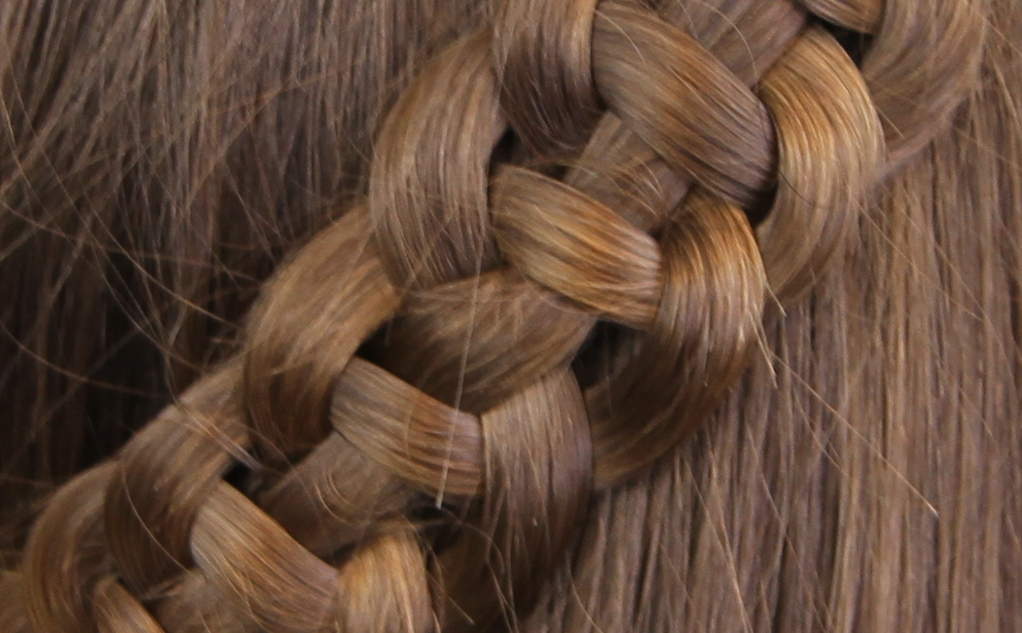
- Pick up a hair section that will become the braid and divide it into four even strands…
- Now you can create this braid in one of two ways… many people would naturally use Method #1, however my mind processes Method #2 better. Simply figure out which method works best for you and stick with it…
- Method #1: Take the left-most strand #1 and go “over” Strand #2 and “under” Strand #3. Then, pick up the rightmost Strand #4 and bring it “under” Strand #3 and “over” Strand #2. Repeat this pattern over and over again until you have a finished braid. {Over, under… under, over… etc.}
- Method #2: Take the left-most strand #1 and go “over” Strand #2, “under” Strand #3, and “over” Strand #4. Now, take the two middle Strands #2 and 3 and cross them so that Strand 2 is now Strand 3. Repeat this pattern over and over again until you have a finished braid. {Over, under, over, cross… over, under, over, cross, etc.}
- Continue the 4-strand braid until you run out of hair…
- Now, pinch Strands #1, 3, and 4 with your right hand and hold Strand #2 in your left hand by itself.
- Gently slide Strands #1, 3, and 4 up Strand #2 until all the hair is squished together at the top. This is what we call “snaking the braid“…
- Now, slowly pull the hair back down the strand maybe 1-2 inches or so until you reach the desired look…
- When the braid looks good to you, simply secure the ends with a hair elastic {you should have one strand longer than the others}…
- Pin the braid in place towards the back/side of head using bobby pins…
- Add an accessory as an accent.
You may choose to do a single pullback, or create another one on the other side of the head and tie them back together.
You can also creatively bring this braid up over the top of the head like a braided headband and I am sure you will receive tons of compliments! {If you do make it a headband, be sure your strands are thin so that the width of the braid is uniform all the way down, rather than wide to thin.}
Enjoy!
If you loved this hairstyle, please feel free to share!
Happy Hairdoing!

* Note from Mindy: Don’t forget to follow us on BlogLovin, a new easy-to-use blog reader!


Thanks soo much. LOVE IT. Now I’ll be
doing it on my sister’s hair.
Hey Mindy,
I try soo many hairstyles and they just always come out horrible! I can’t get it the way you do! I just want people to like me in school with these hairstyles. So can you make more easier ones that look just as awesome? (I even fail at those too lol) thanks!
its really very easy just watch and focus
that means you stink maybe you should not be a hairstylest stupenfull me
lol!
realy forgive me i was kidding jennifer
pretty amazing what your can do with regular four strand braid
hi I love dis
Hello Mindy! I’m your big fan and I live in São Paulo – Brazil. I love everything you do and all the hairstyles I do on my two daughters! They are your fans and your daughters too. I do not know english but I’m using Google translator to communicate with you. I wonder if you can teach to do FOUR STRAND BRAID tapered. Thank you. I love you forever.
i look this hair style well how it looks and i have tried it so many times and i just can’t get it done can you give me some advice on how to get it i really want to learn…
I love watching your tutorials! When I see a hairstyle I like I beg my sister to sit still so I can try it on her! She is a THG fan so when she saw the Prim braid she was in love! I tried putting little orange flowers randomly where the sections cross and it looked gorgeous! Thanks for all the tutorials, they are much appreciated! Now if you’ll excuse me, where did my sister go?
.nice one!!!!before i getthis, i came to 4 different hair braid styles!!!soooo nice, they were all pretty!!!…..on the fifthe time, i did it!!!!
Love your hair. Can you make some that my little sister who’s nine can do by herself?
Thanks Lindy
I’m used to do four-strand braid like this: left strand over the next one, then righ strand under and then I cross the middle ones.
THIS HAIR IS SOOOOO PRETTY!!!!!
Now if only i could actually do it….
THIS HAIR IS SOOOO PRETTY!!!!!!
Now if only I could actually do it….
Hey Mindy, I love this hairstyle although I have tried so many times and still can’t figure it out. I think I braid it properly because it looks like yours then when I snake it up, it doesn’t turn out like yours. I think I am grabbing the right hair too (the 2nd one from the left) I just don’t understand :/
PS. Your hairstyles are great and you and your family are all absolutely beautiful xx
its the same thing for me
I love this! So cool and pretty!
i love this hair style it looks so good on her it has such a soft look to it. My question for you is where did you get that cute flower i want one that is like it
its a fabulous hairstyle!!!!
its so good.!!!
dis is smthng rly awsm!!!!!!!!!! I tried it on my younger sister and she actually loved it…
IT IS AMAZING!!!!!!!!
GOOD JOB… 🙂
Where is your oldest daughter!
i love this braid .. i tryed to do it slow to show my sister it dident work out so well ..
nice one. Could you do some side bun styles? Any variations would be great.
luv this hairdo!!! u need 2 do videos like, every day! (jk u dont hav 2 but u shood) by the way i just saw u on kid history + it totally made my day!
PLEASE DO A HAIRSTYLE FOR OZ THE GREAT AND POWERFUL! I CANT FIGURE OUT HOW TO DO THE MILA KUNIS HAIRSTYLE WHEN SHE FIRST MEETS OZ PLEASE HELP!
I absolutely love this! Took me a few try’s, but I got it! I definitely would like a flower like this, where did you get it? I want to get a few flower clips but I’m not sure where to start looking.
Sometimes simple styles are more elegant and gracious than intricate ones. Flower on the halfway of the braid has doubled its beauty.
congrats! you won!
I MADE THIS AGES AGO
CLICK LINK AND SHARE WITH EVERYONE ITS ON THE KEEP CALM WEBSITE
http://www.keepcalm-o-matic.co.uk/p/keep-calm-cgh-is-the-best/
Cool
Hey that’s awesome! Can you do hair for a first communion. thanks Mindy
Yeah that would be great Mindy!My daughters are having a first communion in april
I mean good hairstyle Mindy
Hey, I’m from Sweden and I just wanted to say that I love your hairstyles
Xoxo
wow…simple yet cute. Reminds me of a ladder braid!
Wow! look’s cute. I think my daughter will gonna love this.
Your daughter is so beautiful, and your tutorials are AMAZING! I watch all of your videos on YouTube 🙂 Love you Mindy & Fam!
http://divinenumber7.blogspot.ca/
Kaylee
I have an idea, you can combine this with the starbust crown braid
OMG!!!!!!!!!!!!! Her eyes are SO gorgeous! Make sure she knows how BEAUTIFUL she is!!!!!!!!!!!!!!
i love the hair! The twins are beatufil god bless u! Omg i sound like a mom lol i am 12 from new York! i wish i could come to the oz movie to see you guys but i have to fly in an airplane! 🙁
I was picked but i couldn’t go because i would’ve had to fly in an airplane
I can’t help but notice that in your videos the annotations (little boxes in which there are words) seem to be cut off in the middle of the sentence, and I often find myself wondering what the rest of it says. Just wanted to give you a heads up for that, I think there is a feature that allows you to make the boxes bigger? Also love the hair, I’m going to try it on my sister!
rude
HOW DO I DO THE END BIT!I AM FED UP!HELP LOL
I Love this!!! So very pretty & sweet….a very soft look….you better believe I will be trying this style this week!!
This is awesome
xvcxv
Can one of the other children have their hair done except the twins?
Love the hair this week!!!
Keep calm and wait
I AM HAVING THE SAME PROBLEM!HELP ME!AX
This looks so cool!